I. Introduction
Xin chào các bạn, hôm nay mình xin được giới thiệu với các bạn một vài tính năng của một số ngôn ngữ lập trình web mới nhất hiện nay. Các bạn có thể sử dụng ngay những tính năng này trong các dự án của mình. Các tính năng này được hỗ trợ trên các trình duyệt hiện nay như Chrome, Firefox, Safari, Edge, Opera, và IE11.
II. HTML, CSS, Javascript Features
1. Native HTML dialog
thẻ dialog được sử dụng để tạo ra một hộp thoại trên trang web. Nó có thể được mở và đóng bằng cách sử dụng các phương thức showModal() và close(). đây là một thẻ đơn giản và tiện dụng hơn việc phải tự tạo một hộp thoại bằng div và css. Ngoài ra tất nhiên bạn có thể style cho nó bằng css như bình thường. nó cũng có hỗ trợ thêm một vài pesudo element như ::backdrop để style cho phần nền của hộp thoại. xem thêm tại MDN
<dialog id="favDialog">
  <form>
    <p>
      <label>Favorite animal:
        <select>
          <option value="default">Choose…</option>
          <option>Brine shrimp</option>
          <option>Red panda</option>
          <option>Spider monkey</option>
        </select>
      </label>
    </p>
    <div>
      <button value="cancel" formmethod="dialog" onclick="favDialog.close()">Close</button>
      <button id="confirmBtn" value="default">Confirm</button>
    </div>
  </form>
</dialog>
<p>
  <button onclick="favDiablog.showModal()">Show the dialog</button>
</p>dialog::backdrop {
background: rgba(0, 0, 0, 0.5);
}// Other way to use with javascript
const confirmBtn = document.getElementById('confirmBtn');
const favDialog = document.getElementById('favDialog');
const openDialogBtn = document.getElementById('openDialogBtn');
confirmBtn.addEventListener('click', () => {
favDialog.close();
});
openDialogBtn.addEventListener('click', () => {
favDialog.showModal();
});
favDialog.addEventListener('cancel', () => {
favDialog.close();
});2. Popover button
Thẻ button có thể được sử dụng để tạo ra một popover. nó có thể được sử dụng để hiển thị một số thông tin cần thiết cho người dùng. xem thêm tại MDN
- lưu ý: Nếu muốn sử dụng tính năng phải bật
Experimental Web Platform featurestrongchrome://flags
<button popovertarget="popoverIn">Open</button>
<div id="popoverIn" popover>
  <p>Popover content</p>
</div>3. New unit of CSS
Trong CSS mới đây Chorme Developer đã thêm một vài đơn vị mới như sau:
cqw: 1% of a query container’s widthcqh: 1% of a query container’s heightcqi: 1% of a query container’s inline sizecqb: 1% of a query container’s block sizecqmin: The smaller value of either cqi or cqbcqmax: The larger value of either cqi or cqb
 CSS New Unit
4. Container Queries
Trong Chorme Web Developer 2023 mới đây đã giới thiệu tính năng Container Query cụ thể
là @container media query. Tính năng này cho phép chúng ta có thể style cho một phần tử
dựa trên kích thước của nó. Điều này giúp chúng ta có thể style cho một phần tử mà không cần
phải dựa vào kích thước của màn hình. xem thêm tại MDN
Ngoài ra trong Container Query bạn có thể sử dụng các đơn vị mới New Unit of CSS để style cho phần tử của mình.
<div class="post">
  <div class="card">
    <h2>Card title</h2>
    <p>Card content</p>
  </div>
</div>.post {
container-type: inline-size; /* sidebar / inline-size */
container-name: post;
}
/* Cú pháp ngắn ngọn hơn của phương thức container */
.post {
container: post / inline-size;
}
@container post (min-width: 700px) {
.card h2 {
font-size: 2em;
}
}
/* Nếu bạn không sử dụng thuộc tính container-name */
@container (min-width: 700px) {
.card h2 {
font-size: 2em;
}
}Và trong TailwindCSS thì Container Query cũng đã được hỗ trợ
<!-- @postCard chính là container-name -->
<div class="@container/postCard">
  <!--  lg là tỉ lệ màn hình và underline là thuộc tính -->
  <div class="@lg/postCard:underline">
  </div>
</div>5. Color Mixing CSS
Trong Chorme Web Developer 2023 mới đây đã giới thiệu tính năng Color Mixing CSS cho phép chúng ta có thể mix màu sắc trong css. xem thêm tại MDN
<div class="box"></div>.box {
/* ... */
background-color: color-mix(in srgb, red, blue);
/* ... */
}6. CSS Nesting
CSS Nesting là tính năng khá giống với sass và scss nhưng hiện tại nó đang được hỗ trợ hạn chế ở một số browser hiện đại mới đây
cụ thể :
- Chorme 112+
- Firefox ( Chưa hỗ trợ )
- Safari 16.5+
- Opera 98+
- Edge 112+
 CSS Nesting - Can I Use it
Đây là ví dụ về CSS Nesting khá giống với scss và sass
<div class="box">
  <div class="box__title">
    <h1>Title</h1>
  </div>
  <div class="box__content">Content</div>
</div>.box {
.box__title {
font-size: 2em;
h1 {
font-size: 3em;
color: red;
}
}
.box__content {
font-size: 1em;
}
}7. CSS :is() and :where()
Trong CSS :is() and :where() cho phép chúng ta có thể style cho một phần tử dựa trên kích thước của nó. Điều này giúp chúng ta có thể style cho một phần tử mà không cần phải dựa vào kích thước của màn hình. xem thêm tại MDN
:is(h1, h2, h3, h4, h5, h6) {
  color: red;
}

:where(h1, h2, h3, h4, h5, h6) {
  color: red;
}8. Javascript structuredClone() global function
Trong Chorme Web Developer 2023 mới đây đã giới thiệu tính năng Javascript Structure Clone cho phép chúng ta có thể clone một object một cách nhanh chóng. xem thêm tại MDN
const someDude = {
  name: "John",
  age: 20,
  address: {
    city: "New York",
    country: "USA"
  }
};

// trong Javascript có vài cách chúng ta có thể clone object

// 1. Sử dụng JSON.parse và JSON.stringify
const bob = JSON.parse(JSON.stringify(someDude));

// 2. Sử dụng Object.assign
const bobButBUppercase = Object.assign({}, someDude);

// 3. Sử dụng spread operator
// shallow clone
const bob_but_snakecase = { ...someDude };và trong Javascript mới đây chúng ta có thể sử dụng structuredClone để clone object
const mushrooms1 = {
  amanita: ["muscaria", "virosa"]
};

const mushrooms2 = structuredClone(mushrooms1);

mushrooms2.amanita.push("pantherina");
mushrooms1.amanita.pop();

console.log(mushrooms2.amanita); // ["muscaria", "virosa", "pantherina"]
console.log(mushrooms1.amanita); // ["muscaria"]9. TransformStream
const { readable, writable } = new TransformStream();

const response = await fetch("https://jsonplaceholder.typicode.com/todos/1");

response.body.pipeThrough(doSomeThingCool).pipeTo(writable);

await fetch("https://jsonplaceholder.typicode.com/todos/1", {
  method: "POST",
  body: readable
});Đoạn code trên sẽ lấy dữ liệu từ https://jsonplaceholder.typicode.com/todos/1 và sau đó sẽ gửi dữ liệu đó lên https://jsonplaceholder.typicode.com/todos/1 với phương thức POST và dữ liệu sẽ được transform bởi doSomeThingCool sau đó chúng ta có thể sử dụng ReadableStream để đọc dữ liệu từ https://jsonplaceholder.typicode.com/todos/1
10. Import maps
Import maps dùng để import các module trong Javascript. xem thêm tại MDN
<script type="importmap">
  {
    "imports": {
      "lodash": "https://cdn.skypack.dev/lodash-es"
    }
  }
</script>11. Json Imports
Trong Javascript để import được một file JSON ta có thể dùng cách sau
import data from './example.json' assert { type: 'json' };{
"name": "John",
"age": 20
}12. Transform Props
.box {
  translate: 10px 10px;
  rotate: 10deg;
  scale: 1.5;
}13. Trig Functions
.circum-size {
  width: calc(2 * 10px * cos(45deg));
  height: calc(2 * 10px * sin(45deg));
}14. Initial Letter
.article {
  initial-letter: 3 2;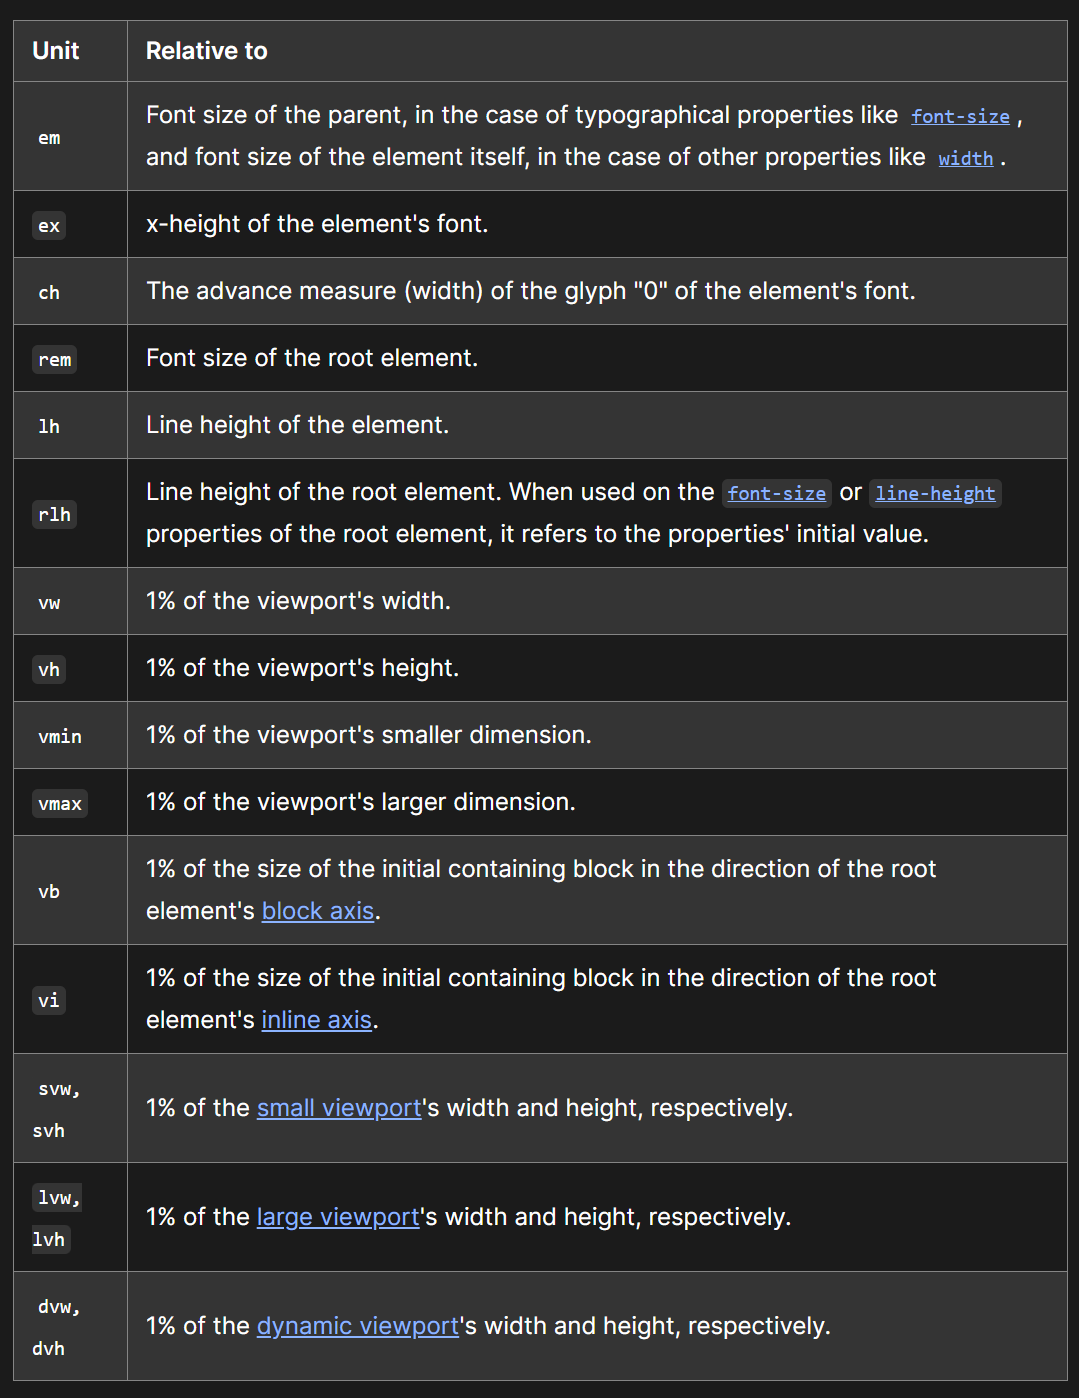
}15. Viewport Units
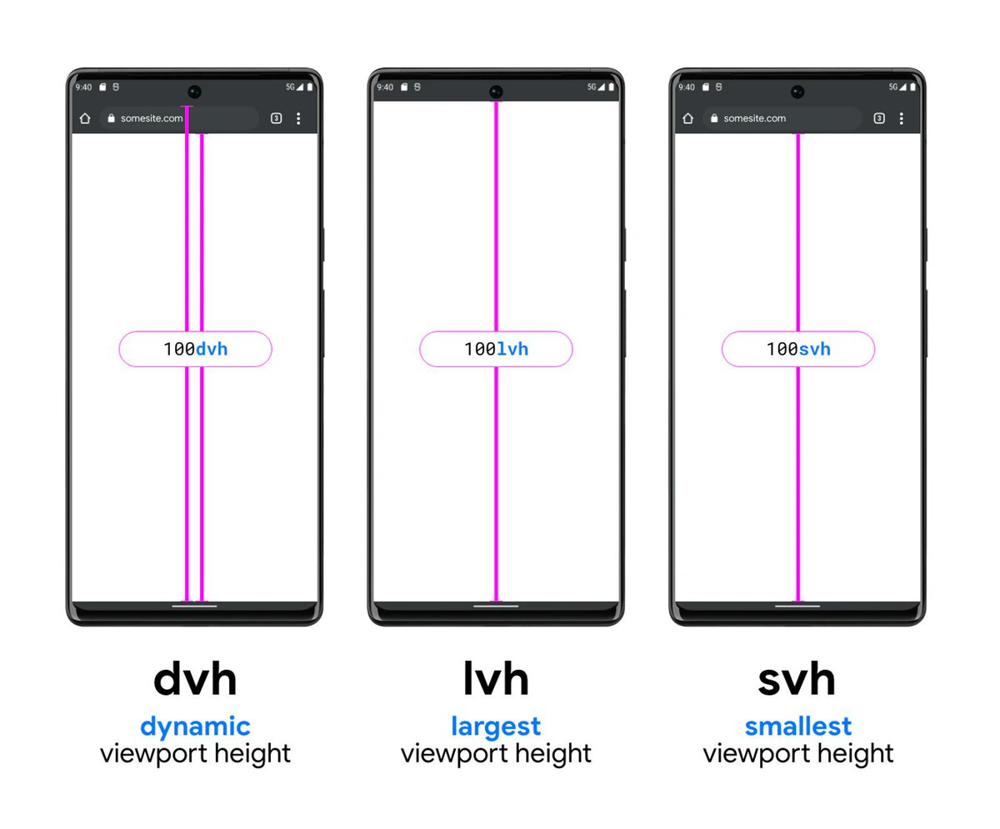
svh và lvh là 2 unit mới trong CSS, svh là screen viewport height và lvh là layout viewport height
ngoài ra còn có dvh là document viewport height, những unit này sẽ giúp chúng ta có thể set height cho một element một cách dễ dàng hơn
 CSS Viewport Units
.article {
  height: 100svh;
  height: 100lvh;
}16. :focus-visible
/* :focus-visible sẽ chỉ apply style khi element đó được focus bởi keyboard */
.button:focus-visible {
  outline: 2px solid blue;
}

/* :focus sẽ apply style khi element đó được focus bởi keyboard hoặc mouse */
.button:focus {
  outline: 2px solid blue;
}

/* :focus:not(:focus-visible) sẽ apply style khi element đó được focus bởi mouse */
.button:focus:not(:focus-visible) {
  outline: none;
}17. Inert Prop
<button inert>Inert Props Button</button>18. View Transition API
View Transition API là một API mới trong Javascript, nó sẽ giúp chúng ta có thể tạo ra các hiệu ứng khi chuyển đổi giữa các view một cách mượt mà hơn ứng dụng cực kỳ tốt cho các ứng dụng web như các ứng dụng đọc sách, xem ảnh, xem video, …
 View Transition API demo
// Một ví dụ về sử dụng View Transition API

function updateView(event) {
    const targetIdentifier = event.target.firstChild || event.target;
    const displayNewImage = () => {
    const mainSrc = `${targetIdentifier.src.split("_th.jpg")[0]}.jpg`;
    galleryImg.src = mainSrc;
    galleryCaption.textContent = targetIdentifier.alt;
  };

  if (!document.startViewTransition) {
    displayNewImage();
    return;
  }

  const transition = document.startViewTransition(() => displayNewImage());
}19. Animation - Timeline
animation-timeline là một api của css để kiểm soát các animation, chúng ta có thể dễ dàng kiểm soát các animation bằng cách sử dụng animation-timeline. Đọc thêm tại MDN
<div id="container">
  <div id="square"></div>
  <div id="stretcher"></div>
</div>#square {
background-color: deeppink;
width: 100px;
height: 100px;
margin-top: 100px;
animation-name: rotateAnimation;
animation-duration: 3s;
animation-direction: alternate;
animation-timeline: squareTimeline;
position: absolute;
bottom: 0;
}
@keyframes rotateAnimation {
from {
transform: rotate(0deg);
}
to {
transform: rotate(360deg);
}
}20. Javascript Assignment Operators
Trong Javascript việc sử dụng Assignment Operators sẽ giúp chúng ta viết code ngắn gọn hơn, đặc biệt là khi chúng ta muốn thực hiện một phép toán và gán kết quả của phép toán đó cho một biến nào đó, giúp ta giảm thiểu viết những đoạn check null, undefined, … khi gán giá trị cho biến
const person = {
  name: 'Kiet',
  age: 22,
  someField: true,
};

const name = person.name; // Kiet

// Toán tử || sẽ trả về giá trị bên phải nếu giá trị bên trái là undefined
const someFieldButNotInObject = person.someFieldButNotInObject || 'default value'; // default value

// Toán tử ?? sẽ trả về giá trị bên phải nếu giá trị bên trái là null hoặc undefined
const someFieldButNotInObject = person.someFieldButNotInObject ?? 'default value'; // default value

// Toán tử && sẽ trả về giá trị bên phải nếu giá trị bên trái là true
const someFieldButNotInObject = person.someField && 'default value'; // default value21. Javascript Destructor
Trong Javascript việc sử dụng Destructor sẽ giúp chúng ta viết code ngắn gọn hơn, đặc biệt là khi chúng ta muốn lấy giá trị của một object và gán giá trị đó cho một biến nào đó, giúp ta giảm thiểu viết những đoạn check null, undefined, … khi gán giá trị cho biến
const person = {
  name: 'Kiet',
  age: 22,
  someThing: {
    someThingElse: 'someThingElse',
  },
};

const { name, age } = person;

console.log(name); // Kiet

console.log(age); // 22

const { someThing: { someThingElse } } = person;

console.log(someThingElse); // someThingElseconst personArr = ['Kiet', 22];
const [name, age] = personArr;
console.log(name); // Kiet
console.log(age); // 22III. Summary
Gần đây, các trình duyệt đã bắt đầu hỗ trợ nhiều tính năng mới, giúp chúng ta có thể xây dựng các ứng dụng web một cách tốt hơn, mượt mà hơn. Trong bài viết này, mình đã giới thiệu cho các bạn 21 tính năng mới của web, các bạn có thể tham khảo và sử dụng những tính năng này để xây dựng các ứng dụng web tốt hơn.